9. Avalonia
Avalonia is a UI framework to develop cross-platform applications for Windows, macOS, Linux, iOS, Android, and web browsers using .NET.
Bugs
While I developed some demo applications, I realized, some things are buggy, i.e. some packages do not play together nicely. Once, the vertical scrollbar was only visible, if the ListBox was in a DockPanel. Do not invest too much time and do not question yourself too long, it might be a bug and not your fault.na
9.1 Architecture
Below you find a high level overview of the architecture of Avalonia. Basically, the cross platform capability is possible by drawing the UI on a canvas (IRenderingPlatform).

9.2 Getting Started
We will use Rider, which has Avalonia pre-installed. In addition, install the extension AvaloniaRider to get live preview for Avalonia XAML files.
9.3 UI


Avalonia is a complete UI framework and hence it provides many built-in controls to compose your UI. In addition, there are many third party libraries. And you may define your own controls, custom controls.
Most likely you will structure your screens with the following basic elements
- Window
- Menu
- layouts, see also the screenshots of AvaloniaUI Building Blocks
- Grid
- DockPanel
- StackPanel -- horizontally, vertically
- basic controls
- Data Templates
Example
Create your first app in Avalonia following the instructions of Test Drive, but using the template Avalonia .NET App provided by Rider. This template will not add the text-block with the greeting as shown in the instructions, but you may simply add
<TextBlock Text="hello" HorizontalAlignment="Center" VerticalAlignment="Center"/>
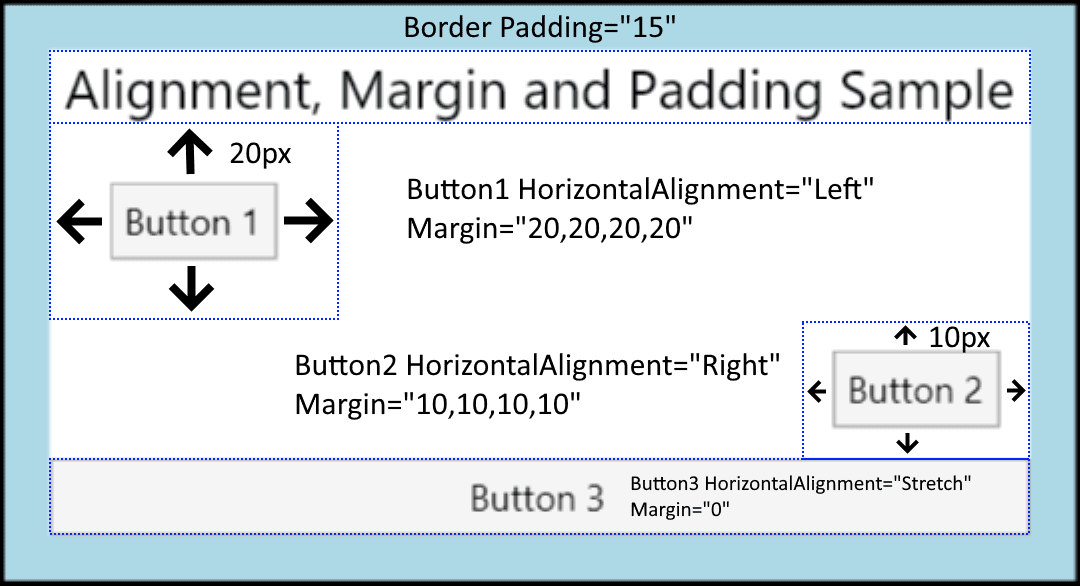
The figure below shows an example for margin, border, StackPanel and the corresponding XAML code, more see Alignment, Margins and Padding.
<Border Background="LightBlue"
        BorderBrush="Black"
        BorderThickness="2"
        Padding="15">
<StackPanel Background="White"
            HorizontalAlignment="Center"
            VerticalAlignment="Top">
    <TextBlock Margin="5,0"
                FontSize="18"
                HorizontalAlignment="Center">
    Alignment, Margin and Padding Sample
    </TextBlock>
    <Button HorizontalAlignment="Left" Margin="20">Button 1</Button>
    <Button HorizontalAlignment="Right" Margin="10">Button 2</Button>
    <Button HorizontalAlignment="Stretch">Button 3</Button>
</StackPanel>
</Border>
Tip
To get used to XAML and the grid layout watch  Avalonia UI - Grid Basics.
Tip
Use the playground to explore the built-in controls.
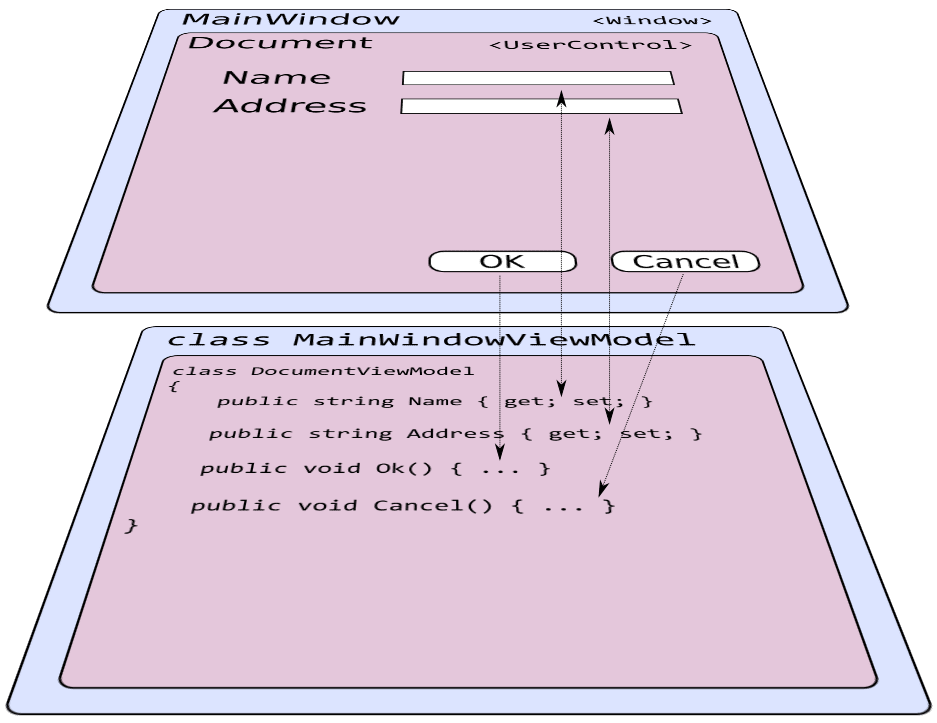
9.4 MVVM
There are two tutorials provided.
Example
Follow the instructions to create a todo app and a music store app Samples & Tutorials. Make sure, you understand the concepts and do each step to practice your programming skills. For the todo-App start your terminal in Rider (bottom left) and create the ViewModels etc. using the CLI. The music store app gives instructions for Rider. The instructions are detailed, but not for dummies, i.e. you need to understand what you are doing to get a running app.
Example
Check the video 008. Avalonia UI - View Model Basics MVVM.
The documentation recommends to use ReactiveUI to implement MVVM in Avalonia. It is automatically added if you create a new Avalonia MVVM project. However, there is another widely used MVVM library, which we will use with MAUI. I therefore suggest, you use CommunityToolkit.Mvvm and whatch the video to switch from ReactiveUI to MVVM Toolkit Learn Avalonia UI - Replace ReactiveUI with CommunityToolkit.Mvvm.
In the following you will find some snippets to implement MVVM in Avalonia with the toolkit.
using System;
using System.ComponentModel.DataAnnotations;
using CommunityToolkit.Mvvm.ComponentModel;
using CommunityToolkit.Mvvm.Input;
using MVVM.Models;

namespace MVVM.ViewModels;

public partial class AddStudentViewModel : ObservableValidator
{
    [ObservableProperty]
    private DateTimeOffset _birthday = DateTimeOffset.Now;

    [Required] [MinLength(2)] [MaxLength(100)]
    [NotifyCanExecuteChangedFor(nameof(SaveCommand))]
    [ObservableProperty]
    private string _name = "";

    [RelayCommand(CanExecute = nameof(CanSave))]
    private void Save()
    {
        StudentModel.GetStudentModel().Add(new StudentModel.Student(Name, Birthday.DateTime));
        Name = "";
    }

    private bool CanSave()
    {
        return !string.IsNullOrWhiteSpace(Name);
    }
}
Here is the control binding to this viewmodel.
<UserControl ...
    xmlns:viewModels="clr-namespace:MVVM.ViewModels"
    x:Class="MVVM.Views.AddStudentView"
    x:DataType="viewModels:AddStudentViewModel">
    <StackPanel Orientation="Vertical" Spacing="10">
        <Label>Name</Label>
        <TextBox Text="{Binding Name}" />
        <DatePicker Name="DatePicker" Margin="10" SelectedDate="{Binding Birthday}" />
        <Button Command="{Binding SaveCommand}">Add</Button>
    </StackPanel>
</UserControl>
ReactUI & MVVM Toolkit
Many users seem to use both packages side by side. Hence, if the documentation states examples using ReactUI and it is too difficult to adapt it for MVVM Toolkit, use it as it is.
9.5 Form Validation
Avalonia provides different ways to communicate failed validation of input fields to the user, see the Validating a Property. ObservableValidator describes how to do validation with the recommended MVVM Toolkit. See the example above.
9.6 UI Thread
As discussed in Asynchronous Programming you need to program asynchronously whenever you have tasks lasting longer than 50 ms. The article How To Access the UI Thread gives you the details for Avalonia.
9.7 Logging
You can simply use Log. to log information, see Logging. In addition, there are more sophisticated libraries like Serilog and NLog.